2. Quick start guide
This document will guide you from importing the virtual machine to debugging an Hello World! example on a customized Linux distribution you will generate with OpenEmbedded/Yocto toolchain.
2.1. Install
The development environment is provided as a virtual disk (to be used by a VirtualBox virtual machine) which you can download from this page:
Important
Compute the MD5SUM value of the zip file you downloaded and compare it to the golden one you find in the download page.
Uncompress the file, and you will get a .vdi file that is our virtual disk image. The environment contains the SDK for all the boards provided by Architech, Pengwyn included.
2.1.1. Download VirtualBox
For being able to use it, you first need to install VirtualBox (version 4.2.10 or higher). You can get VirtualBox installer from here:
https://www.virtualbox.org/wiki/Downloads
Download the version that suits your host operating system. You need to download and install the Extension Pack as well.
Important
Make sure that the extension pack has the same version of VirtualBox.
Install the software with all the default options.
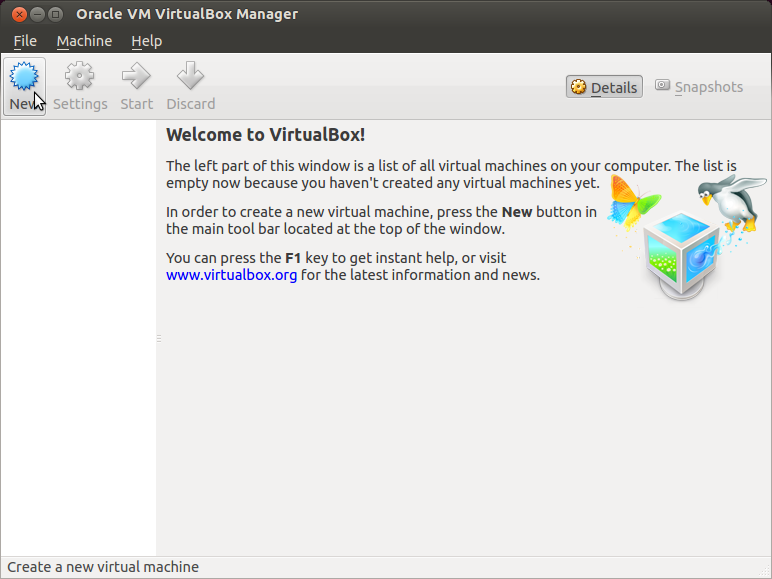
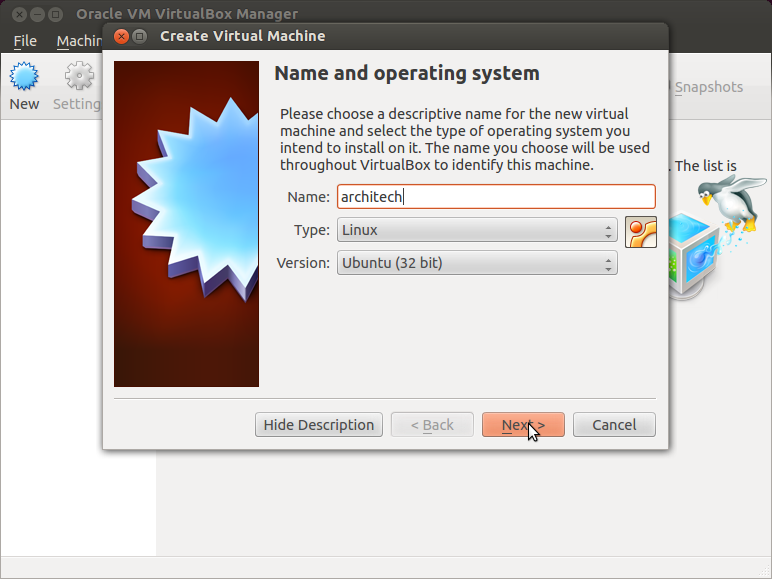
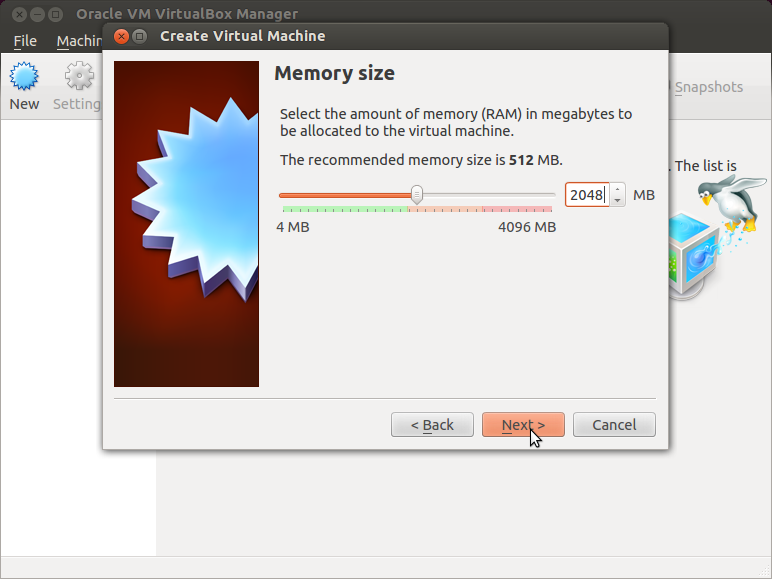
2.1.2. Create a new Virtual Machine
- Run VirtualBox
- Click on New button
- Select the name of the virtual machine and the operating system type
- Select the amount of memory you want to give to your new virtual machine
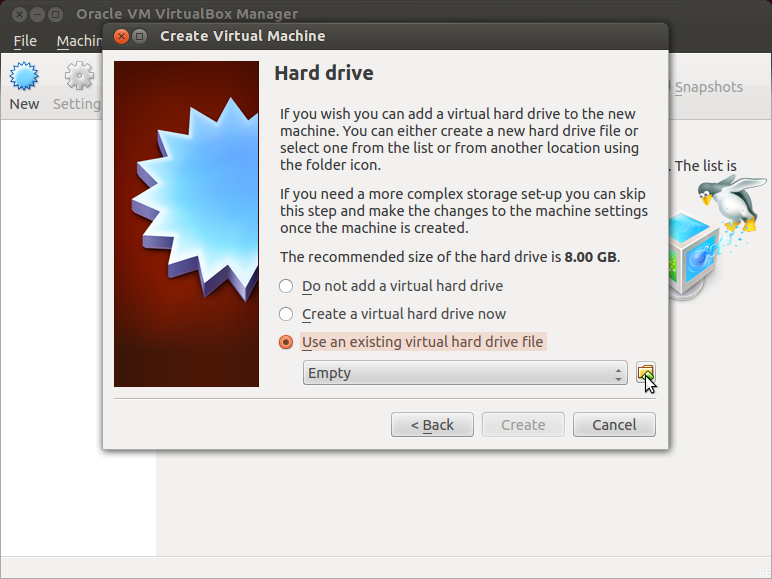
- Make the virtual machine use Architech’s virtual disk by pointing to the downloaded file. Than click on Create.
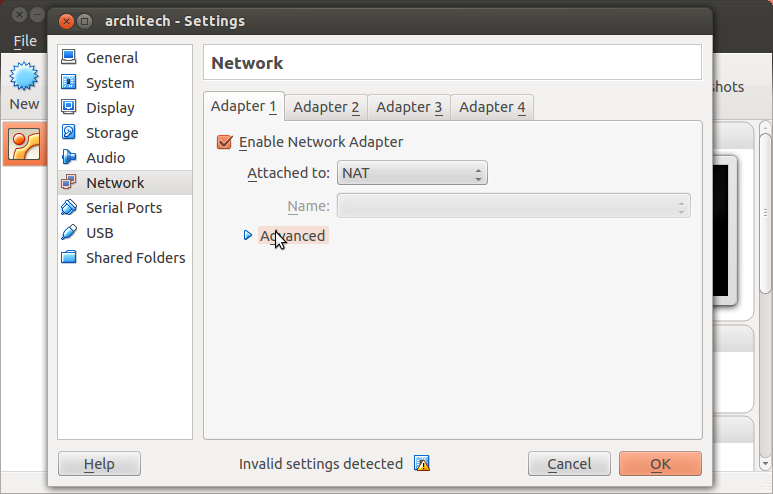
2.1.3. Setup the network
We need to setup a port forwarding rule to let you (later) use the virtual machine as a local repository of packages.
Note
The virtual machine must be off
- Select Architech’s virtual machine from the list of virtual machines
- Click on Settings
- Select Network
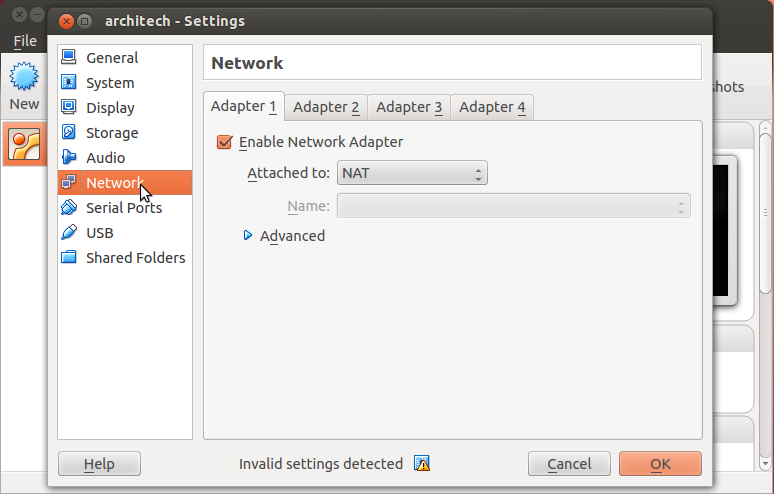
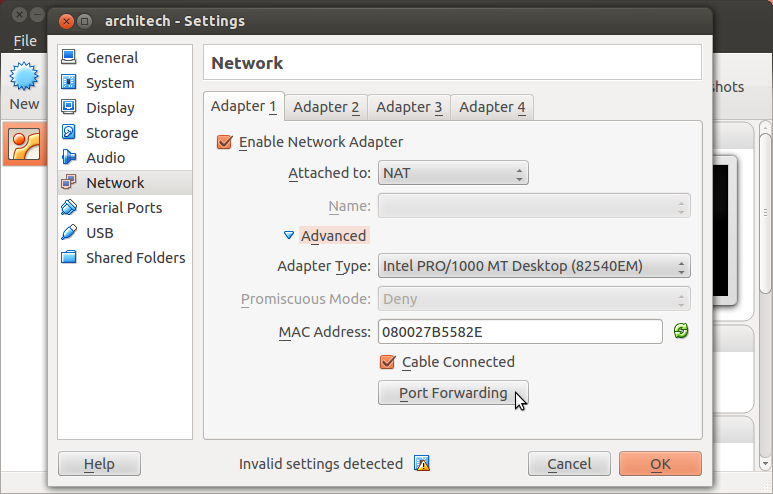
- Expand Advanced of Adapter 1
- Click on Port Forwarding
- Add a new rule
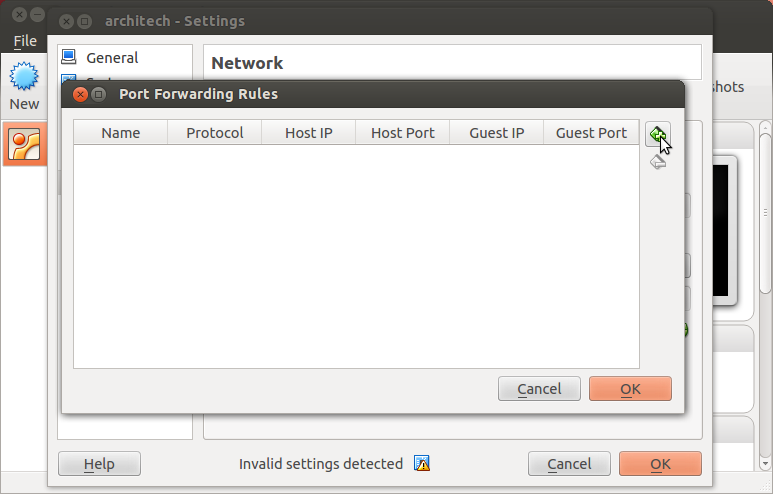
- Configure the rule
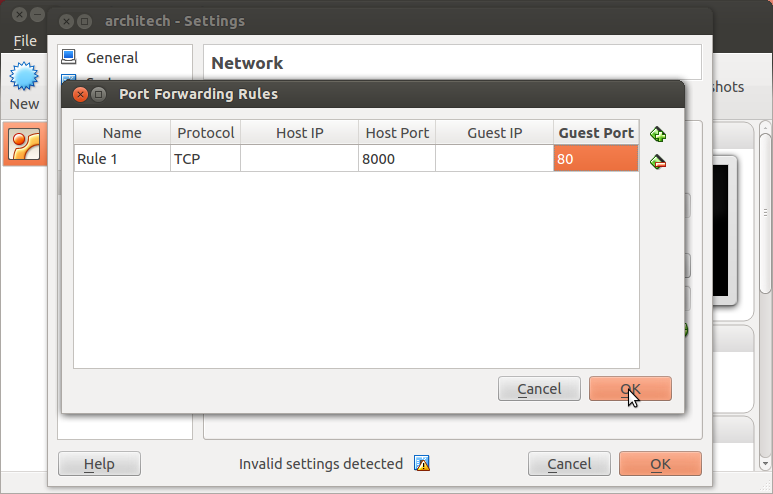
- Click on Ok
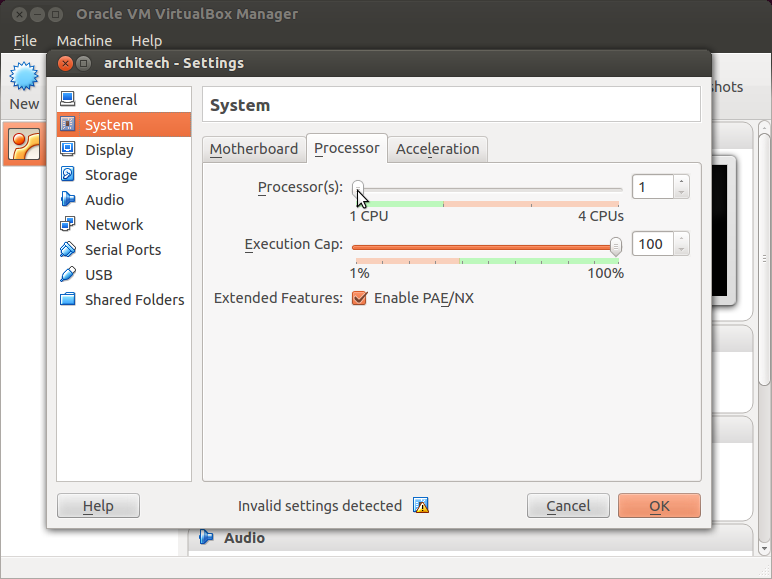
2.1.4. Customize the number of processors
Building an entire system from the ground up is a business that can take up to several hours. To improve the performances of the overall build process, you can, if your computer has enough resources, assign more than one processor to the virtual machine.
Note
The virtual machine must be off
- Select Architech’s virtual machine from the list of virtual machines
- Click on Settings
- Select System
- Select Processor
- Assign the number of processors you wish to assign to the virtual machine
2.1.5. Create a shared folder
A shared folder is way for host and guest operating systems to exchange files by means of the file system. You need to choose a directory on your host operating system to share with the guest operating system.
Note
The virtual machine must be off
- Select Architech’s virtual machine from the list of virtual machines
- Click on Settings
- Select Shared Folders
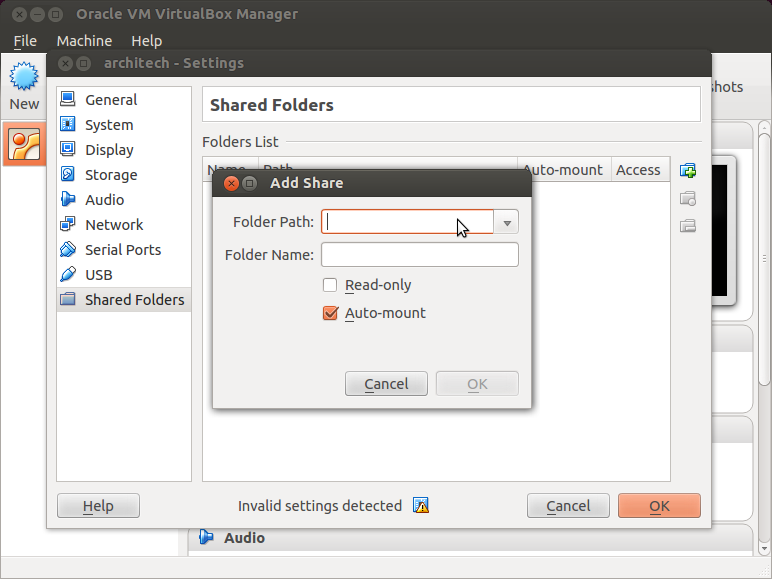
- Add a new shared folder
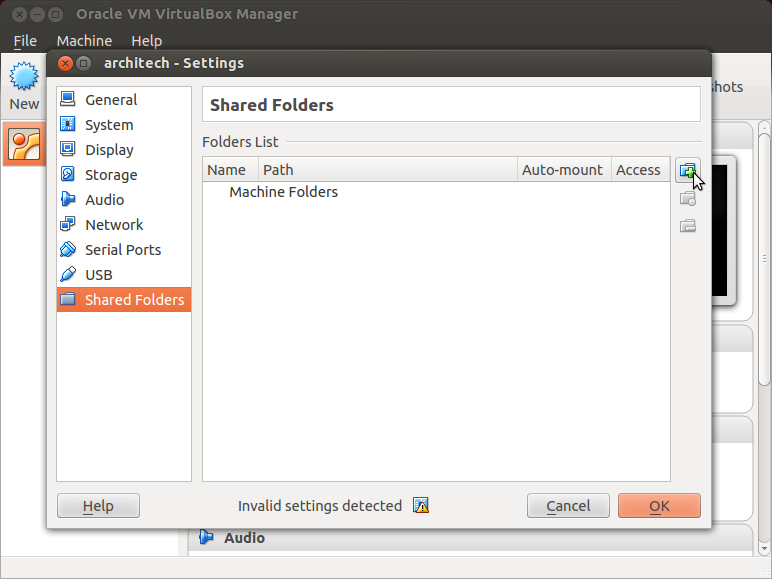
- Choose a directory to share on your host machine. Make sure Auto-mount is selected.
Once the virtual machine has been booted, the shared folder will be mounted under /media/ directory inside the virtual machine.
2.1.6. Install VBox Additions
The VBox addictions add functionalities to the virtual machine such as better graphic driver and more. It is already installed in the SDK but is important re-install it to configuring correctly the virtual machine with your operating system.
- Starts the virtual machine
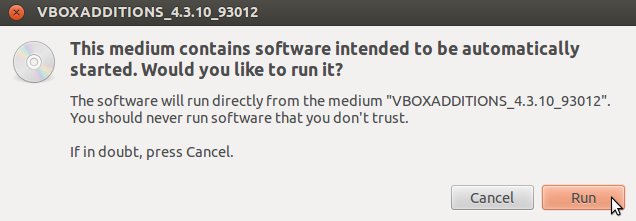
2. Click on the virtual box menu to the voice Devices and select Insert Guest Additions CD Images.... A message box will appear at the start of the installation, click on run button
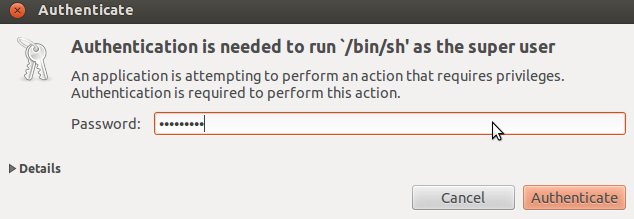
- To proceed are required admin privileges, so insert the password architech when asked
- Then a terminal will show the installation progress. When finished, press Enter key
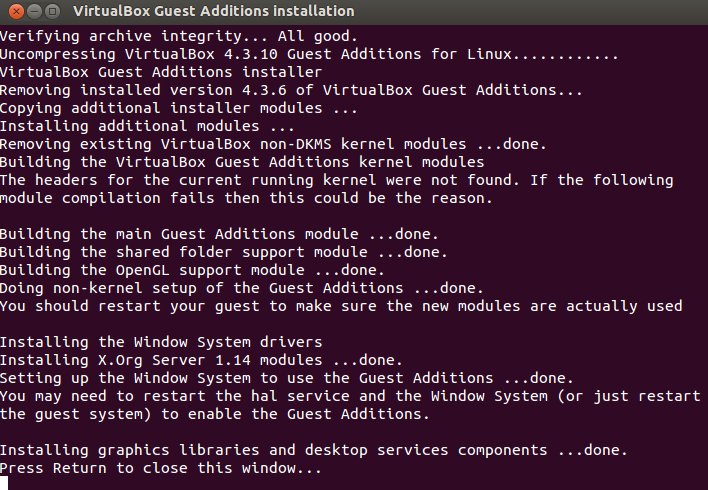
- Before to use the SDK, it is required reboot the virtual machine
2.2. Build
Important
A working internet connection, several GB of free disk space and several hours are required by the build process
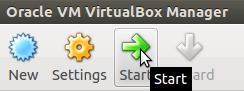
- Select Architech’s virtual machine from the list of virtual machines inside Virtual Box application
- Click on the icon Start button in the toolbar and wait until the virtual machine is ready
- Double click on Architech SDK icon you have on the virtual machine desktop.

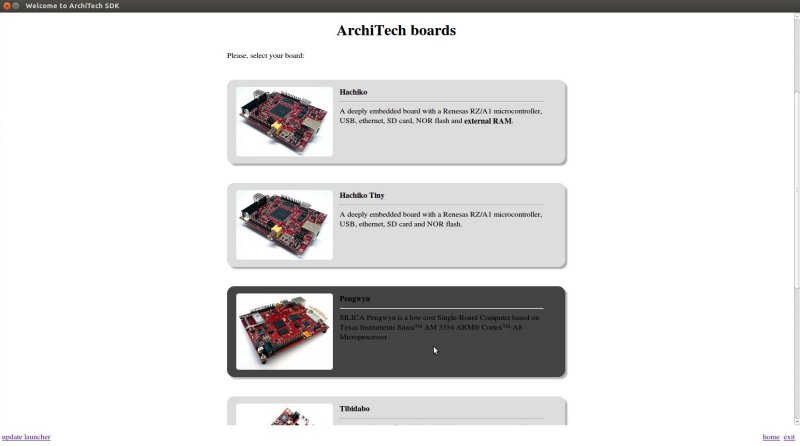
- The first screen gives you two choices: ArchiTech and 3rd Party. Choose ArchiTech.
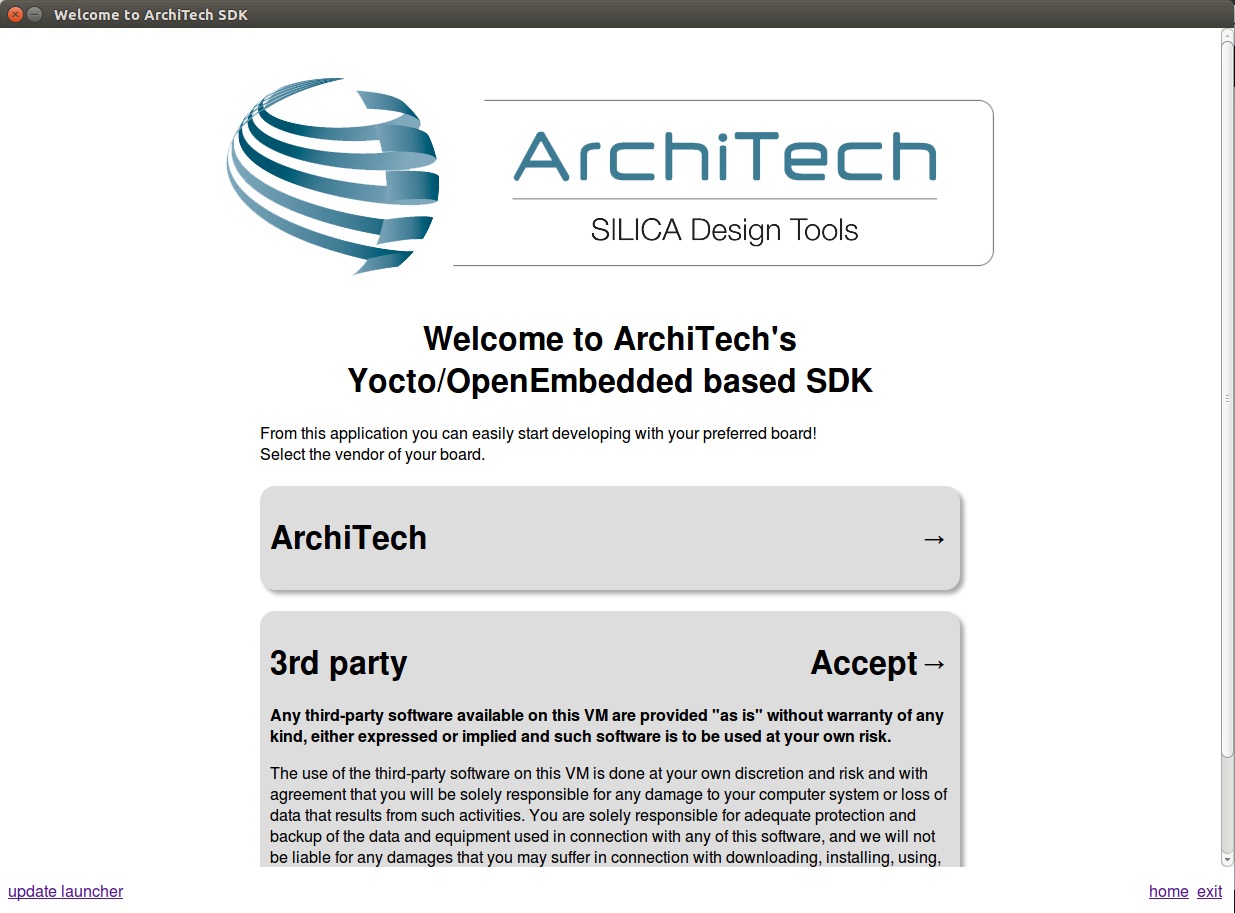
- Select Pengwyn as board you want develop on.
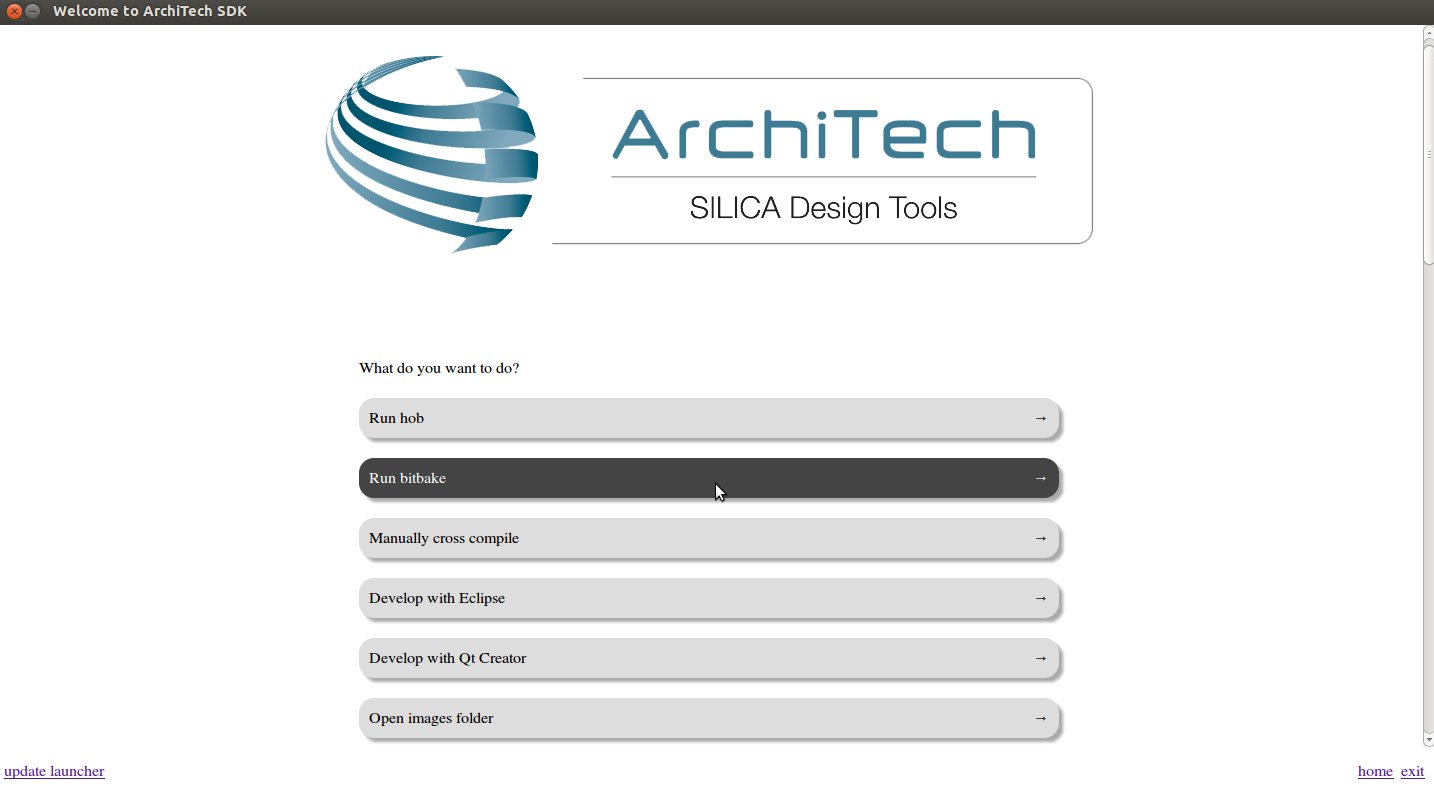
- A new screen opens up from where you can perform a set of actions. Click on Run bitbake to obtain a terminal ready to start to build an image.
- Open local.conf file:
gedit conf/local.conf- Go to the end of the file and add the following lines:
EXTRA_IMAGE_FEATURES_append = " tools-debug debug-tweaks"
IMAGE_INSTALL_append = " tcf-agent gdbserver"
or
EXTRA_IMAGE_FEATURES_append = " tools-debug debug-tweaks"
IMAGE_FEATURES_append = " eclipse-debug"
This will trigger the installation of a features set onto the final root file system, like tcf-agent and gdbserver.
- Save the file and close gedit.
- Build core-image-minimal-dev image by means of the following command:
bitbake core-image-minimal-devAt the end of the build process, the image will be saved inside directory:
/home/architech/architech_sdk/architech/pengwyn/yocto/build/tmp/deploy/images/pengwyn- Setup sysroot directory on your host machine:
sudo tar -zxf /home/architech/architech_sdk/architech/pengwyn/yocto/build/tmp/deploy/images/pengwyn/core-image-minimal-dev-pengwyn.tar.gz -C /home/architech/architech_sdk/architech/pengwyn/sysroot/Note
sudo password is: “architech“
2.3. Deploy
To deploy the root file system and the boot partition, first you need a SD card correctly formatted.
2.3.1. How to create the SD card
This section describes the steps to be followed to create a standalone bootable system on SD card.
Ensure that the following is available:
- An SD memory card reader/programmer to copy files from the Linux Host. The SD card reader must be accessible from VirtualBox.
- An USB device to read and write a SD card.
Warning
Not all computer built-in readers can be used, use USB connected devices instead.
- An SD card
Warning
Your sd-card will be formatted and all the data contained in it will be lost forever!
- The tool scripts (download link pengwyn-tools-dizzy.tar.bz2) and decompress in a directory. eg:
mkdir -p /home/architech/Desktop/pengwyn-tools
tar -jxf pengwyn-tools-dizzy.tar.bz2 -C /home/architech/Desktop/pengwyn-tools- A Linux host with fdisk, sfdisk, mkfs.ext3 and mkfs.vfat utilities. If you are running the VM with Ubuntu pre-installed and the environment already in place, all the packages are already available.
- The files MLO, u-boot.img, zImage-pengwyn-dvi.dtb, zImage, (optionally) the kernel modules (modules-3.2.0-rX-pengwyn.tgz, where X is the revision number for the kernel modules, without any modification to the kernel configuration it should be 0) and the root file system with name ending with -pengwyn.tar.gz are available inside the images deploy directory (<build directory>/tmp/deploy/images/pengwyn/, if your build directory is the default one, then the deploy directory is /home/architech/architech_sdk/architech/pengwyn/yocto/build/tmp/deploy/images/pengwyn).
cd /home/architech/Desktop/pengwyn-tools
sudo ./fast-create-sdcard.sh
Note
2.3.2. How to build the SD card
- Run the VM on VirtualBox
- Connect your SD card reader to your computer than to the virtual machine, from VirtualBox menu select Devices → USB Devices → “your SDcard reader”.
- Insert the SD card into the adapter (in this example we are inserting an SD card already partitioned with a FAT and an EXT3 partition, that is the basic configuration for the Pengwyn board).
- Run the following command (sudo password: architech)
sudo fdisk -l

Disk /dev/sdb: 1971 MB, 1971322880 bytes
255 heads, 63 sectors/track, 239 cylinders
Units = cylinders of 16065 * 512 = 8225280 bytes
Sector size (logical/physical): 512 bytes / 512 bytes
I/O size (minimum/optimal): 512 bytes / 512 bytes
Disk identifier: 0x9bfa2153

Device Boot      Start         End      Blocks   Id  System
/dev/sdb1   *           1           9       72261    c  W95 FAT32 (LBA)
/dev/sdb2 11 239 1839442+ 83 Linux- Find the device name from fdisk command output, in this example is /dev/sdb.
- Run the script (in pengwyn-tools folder) that will prepare the SD card with all the needed files to run the system:
sudo ./fast-create-sdcard.sh+------------------------------------------------------------------------------+
| |
| This script will create a bootable SD card. |
| The script must be run with root permissions. |
| |
+------------------------------------------------------------------------------+
+------------------------------------------------------------------------------+
| LIST OF AVAILABLE DRIVES: |
+------------------------------------------------------------------------------+
# major minor size name
1: 8 16 1927168 sdb
Enter Device Number #:+------------------------------------------------------------------------------+
| |
| This script will create a bootable SD card. |
| The script must be run with root permissions. |
| |
+------------------------------------------------------------------------------+
+------------------------------------------------------------------------------+
| LIST OF AVAILABLE DRIVES: |
+------------------------------------------------------------------------------+
# major minor size name
1: 8 16 1927168 sdb
Enter Device Number #: 1
sdb was selected
sdb1 sdb2
72261 1839442
Mount the partitions
Emptying partitions
Syncing....
+------------------------------------------------------------------------------+
| Copying files now... will take minutes |
+------------------------------------------------------------------------------+
Copying boot partition
Copying file system partition
Copying modules
Syncing....
Un-mount the partitions
Remove created temp directories
Operation Finished
Press ENTER to finishMake sure everything has been really written to the SD card:
syncThen unmount the SD card from your computer and plug the SD in the board socket.
2.4. Boot
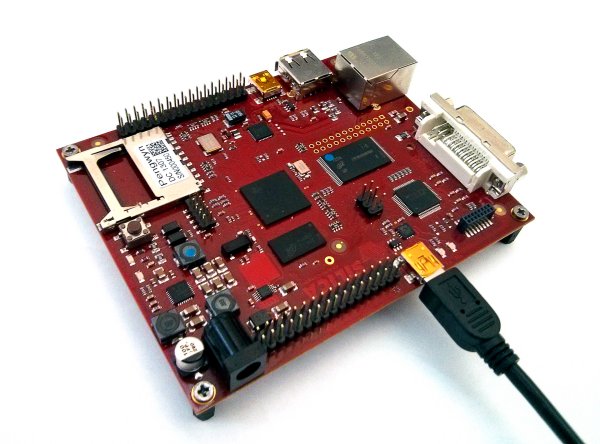
First of all, make sure the board can boot entirely from the SD-Card by setting J1 closed and J2 and J3 opened:
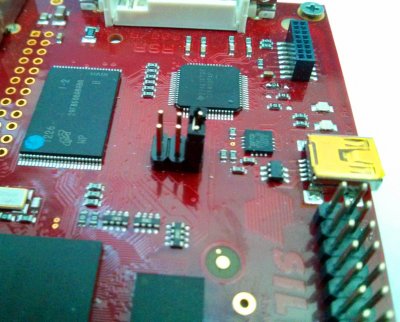
Pengwyn takes the power from the mini-USB connector CN6 and/or connector CN1.
Now it’s time to start the serial console.
which you can connect, by means of a mini-USB cable, to your personal computer.
Note
Every operating system has its own killer application to give you a serial terminal interface. In this guide, we are assuming your host operating system is Ubuntu.
On a Linux (Ubuntu) host machine, the console is seen as a ttyUSB***X* device (where X is a number) and you can access to it by means of an application like minicom.
Minicom needs to know the name of the serial device. The simplest way for you to discover the name of the device is by looking to the kernel messages, so:
- clean the kernel messages
sudo dmesg -c- connect the mini-USB cable to the board already powered-on
- display the kernel messages
dmesg- read the output
[ 2614.290675] usb 3-4: >new full-speed USB device number 4 using xhci_hcd
[ 2614.313854] usb 3-4: >New USB device found, idVendor=0403, idProduct=6015
[ 2614.313861] usb 3-4: >New USB device strings: Mfr=1, Product=2, SerialNumber=3
[ 2614.313865] usb 3-4: >Product: FT230X Basic UART
[ 2614.313868] usb 3-4: >Manufacturer: FTDI
[ 2614.313870] usb 3-4: >SerialNumber: DN002OZI
[ 2614.379284] usbcore: registered new interface driver usbserial
[ 2614.379298] usbcore: registered new interface driver usbserial_generic
[ 2614.379306] USB Serial support registered for generic
[ 2614.379310] usbserial: USB Serial Driver core
[ 2614.387899] usbcore: registered new interface driver ftdi_sio
[ 2614.387914] USB Serial support registered for FTDI USB Serial Device
[ 2614.387997] ftdi_sio 3-4:1.0: >FTDI USB Serial Device converter detected
[ 2614.388029] usb 3-4: >Detected FT-X
[ 2614.388031] usb 3-4: >Number of endpoints 2
[ 2614.388034] usb 3-4: >Endpoint 1 MaxPacketSize 64
[ 2614.388035] usb 3-4: >Endpoint 2 MaxPacketSize 64
[ 2614.388037] usb 3-4: >Setting MaxPacketSize 64
[ 2614.388260] usb 3-4: >FTDI USB Serial Device converter now attached to /dev/ttyUSB0
[ 2614.388288] ftdi_sio: v1.6.0:USB FTDI Serial Converters Driver
As you can see, here the device has been recognized as /dev/ttyUSB0.
Now that you know the device name, run minicom:
sudo minicom -wsIf minicom is not installed, you can install it with:
sudo apt-get install minicomthen you can setup your port with these parameters:
+-----------------------------------------------------------------------+
| A -    Serial Device      : /dev/ttyUSB0                              |
| B - Lockfile Location     : /var/lock                                 |
| C -   Callin Program      :                                           |
| D -  Callout Program      :                                           |
| E -    Bps/Par/Bits       : 115200 8N1                                |
| F - Hardware Flow Control : No                                        |
| G - Software Flow Control : No                                        |
|                                                                       |
|    Change which setting?                                              |
+-----------------------------------------------------------------------+
        | Screen and keyboard      |
        | Save setup as dfl        |
        | Save setup as..          |
        | Exit                     |
        | Exit from Minicom        |
        +--------------------------+
If on your system the device has not been recognized as /dev/ttyUSB0, just replace /dev/ttyUSB0 with the proper device.
Once you are done configuring the serial port, you are back to minicom main menu and you can select exit.
Give root to the login prompt:
Board
pengwyn login: root
and press Enter.
Note
Sometimes, the time you spend setting up minicom makes you miss all the output that leads to the login and you see just a black screen, press Enter then to get the login prompt.
2.5. Code
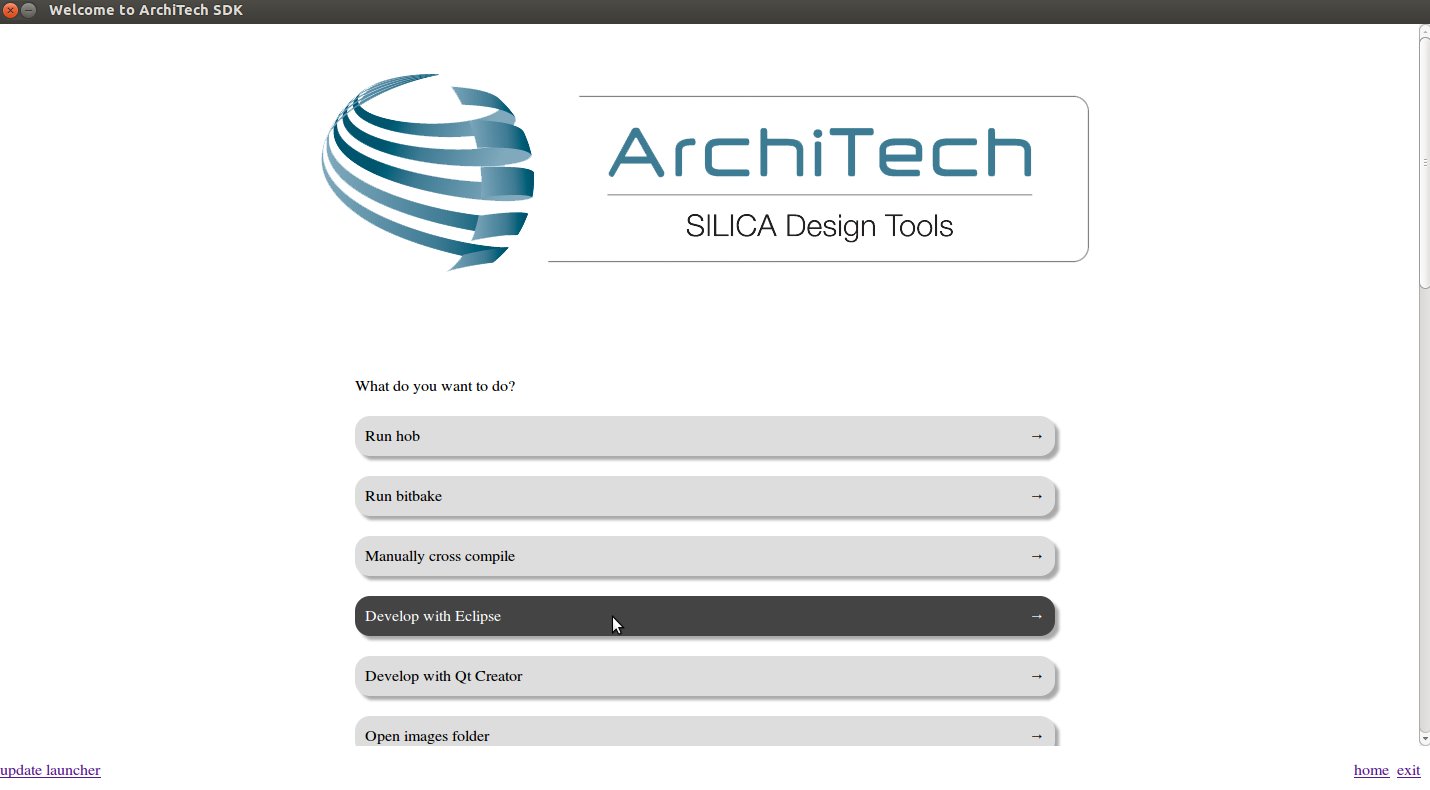
The time to create a simple HelloWorld! application using Eclipse has come.
Note
- Return to the Splashscreen, which we left on Pengwyn board screen, and click on Develop with Eclipse.
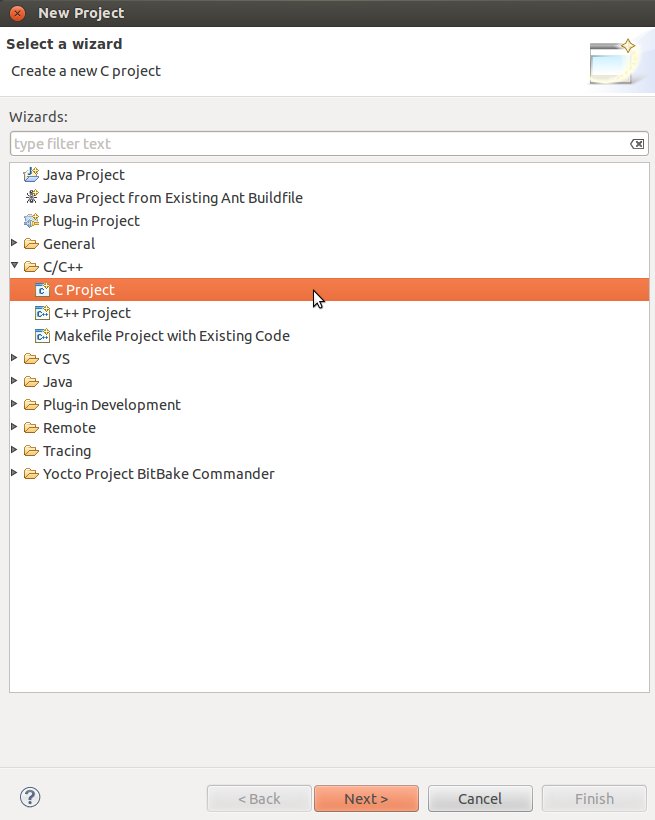
- Go to File→ New→ Project..., in the node “C/C++” select C Project and press next button.
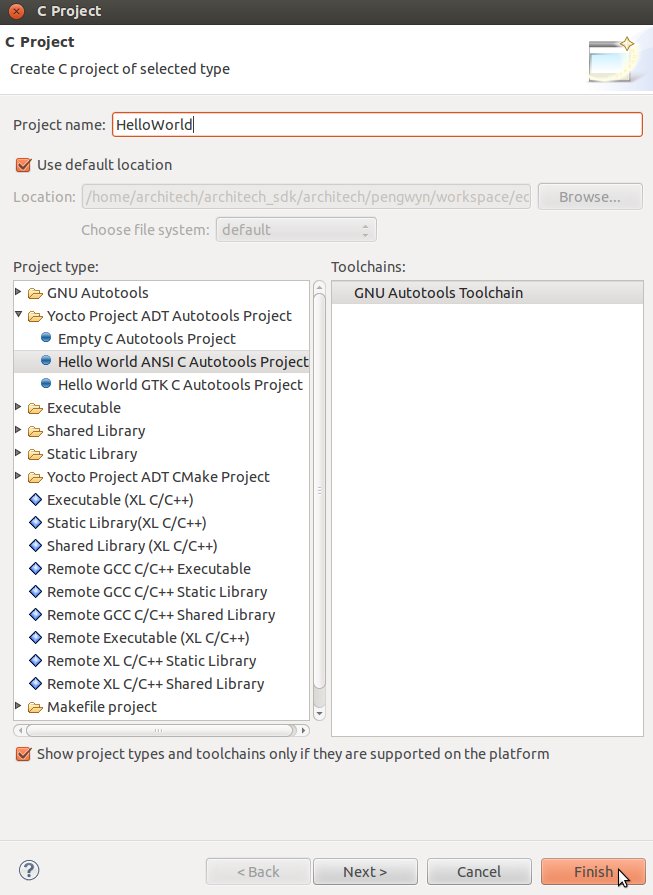
- Insert HelloWorld as project name, open the node Yocto Project ADT Autotools Project and select Hello World ANSI C Autotools Project and press next button.
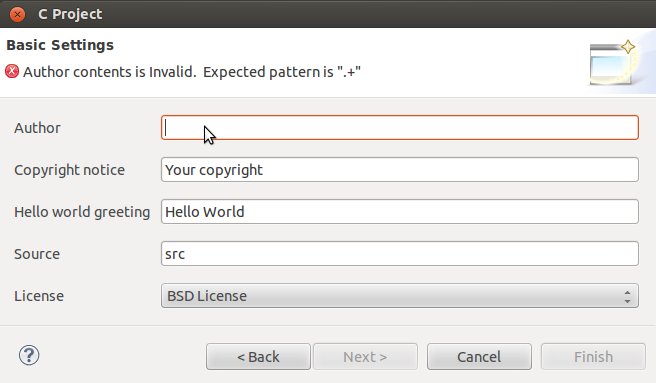
- Insert Author field and click on Finish button. Select Yes on the Open Associated Perspective? question.
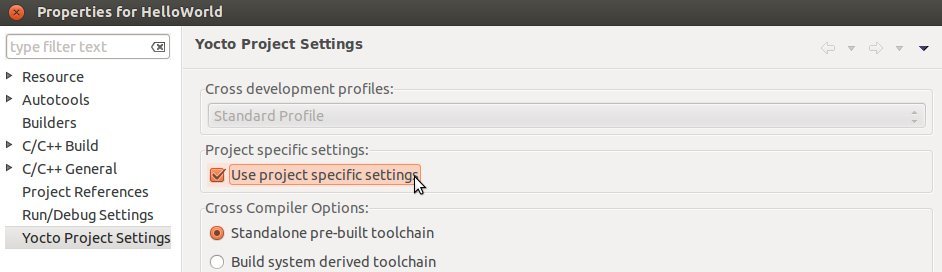
- Open the windows properties clicking on Project→ Properties and select Yocto Project Settings. Check Use project specific settings in order to use the pengwyn cross-toolchain.
- Click on OK button and build the project by selecting Project→ Build All.
2.6. Debug
Use an ethernet cable to connect the board (connector XF1) to your PC. Configure your workstation ip address as 192.168.0.100. Make sure the board can be seen by your host machine:
ifconfig eth0 192.168.0.10ping 192.168.0.10If the output is similar to this one:
64 bytes from 192.168.0.100: icmp_req=1 ttl=64 time=0.946 ms
64 bytes from 192.168.0.100: icmp_req=2 ttl=64 time=0.763 ms
64 bytes from 192.168.0.100: icmp_req=3 ttl=64 time=0.671 ms
64 bytes from 192.168.0.100: icmp_req=4 ttl=64 time=0.793 ms
then the ethernet connection is ok. Enable the remote debug with Yocto by typing this command on Pengwyn console:
/etc/init.d/tcf-agent restartOn the Host machine, follow these steps to let Eclipse deploy and debug your application:
- Select Run→ Debug Configurations...
- In the left area, expand C/C++Remote Application.
- Locate your project and select it to bring up a new tabbed view in the Debug Configurations Dialog.

- Insert in C/C++ Application the filepath (on your host machine) of the compiled binary.
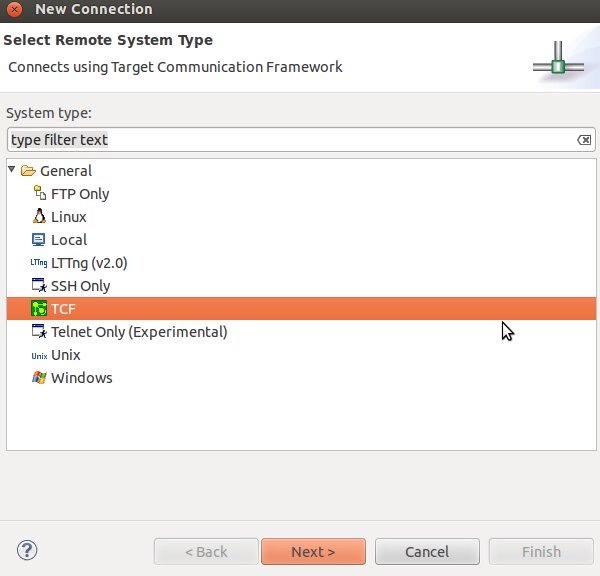
- Click on New button near the drop-down menu in the Connection field.
- Select TCF icon.
- Insert in Host Name and Connection Name fields the IP address of the target board. (e.g. 192.168.0.10)
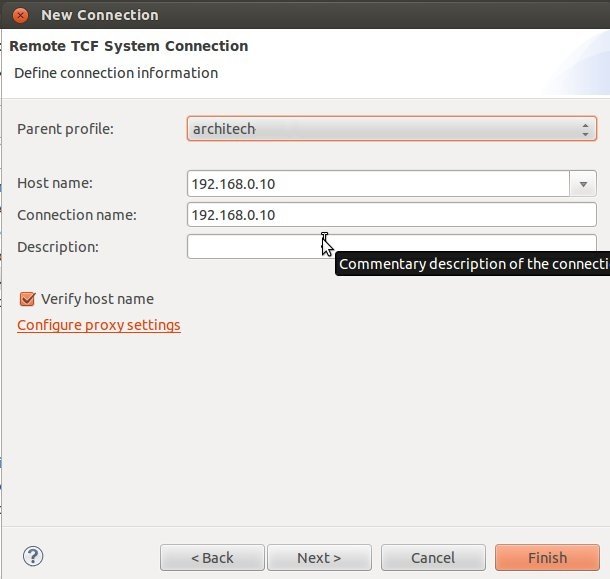
- Then press Finish.
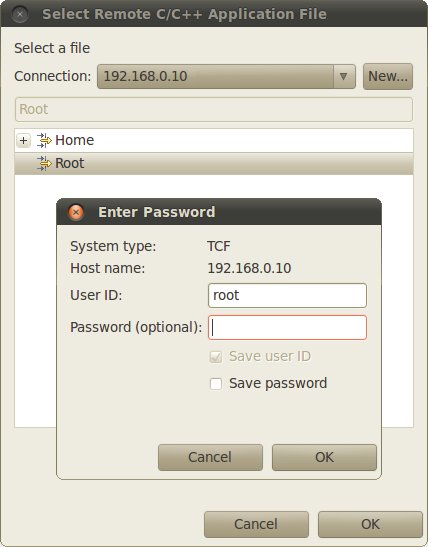
- Use the drop-down menu now in the Connection field and pick up the IP Address you entered earlier.
- Enter the absolute path on the target into which you want to deploy the cross-compiled application. Use the Browse button near Remote Absolute File Path for C/C++Application: field. No password is needed.
- Enter also in the path the name of the application you want to debug. (e.g. HelloWorld)

- Select Debugger tab
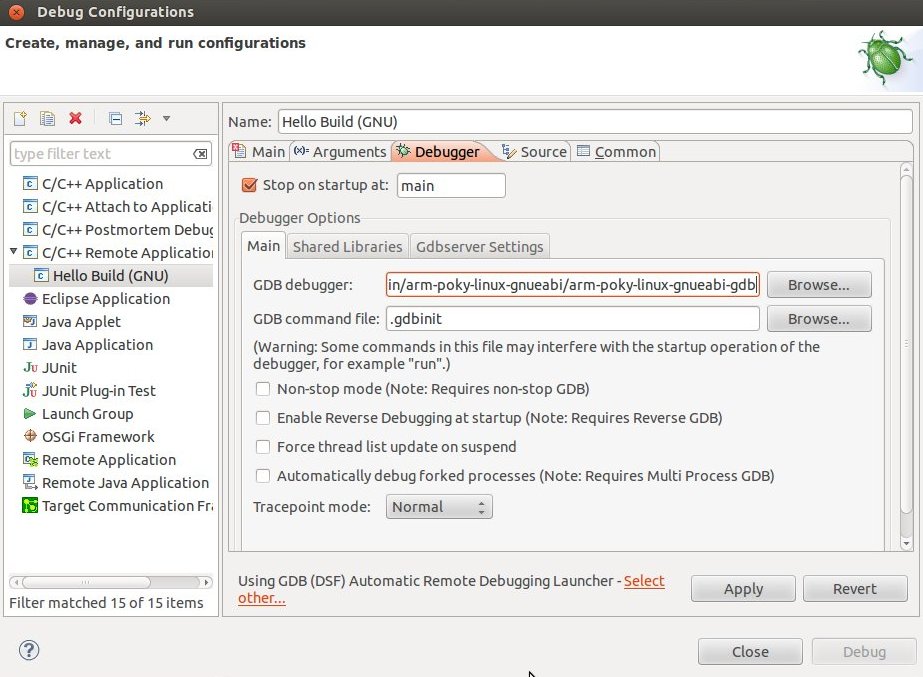
- In GDB Debugger field, insert the filepath of gdb for your toolchain
/home/architech/architech_sdk/architech/pengwyn/toolchain/sysroots/i686-pokysdk-linux/usr/bin/arm-poky-linux-gnueabi/arm-poky-linux-gnueabi-gdb- In Debugger window there is a tab named Shared Library, click on it.
- Add the libraries paths lib and usr/lib of the rootfs (which must be the same used in the target board)
/home/architech/architech_sdk/architech/pengwyn/sysroot/lib
/home/architech/architech_sdk/architech/pengwyn/sysroot/usr/lib- Click Debug to login.
- Accept the debug perspective.
Important
If debug does not work, check on the board if tcf-agent is running and gdbserver has been installed. You can ignore the message “Cannot access memory at address 0x0”.